Archive for April, 2008
Setting Google Maps Street View Orientation with GPov
In our last post we introduced the new Google Maps API Street View objects which give developers the ability to enable Flash based street visualizations in select U.S. cities. I described the functionality provided by the Street View objects as well as the capabilities of each object. Finally, we took a look at a simple code sample that shows you how to use these objects to create a Street View Flash viewer.
In this post we will examine how you can control the orientation of the Street View Flash viewer through the GPov class. As we discussed last time, a Street View image consists of both a location, specified by a GLatLng object, as well as a particular orientation. The orientation is specified through the GPov class. Used together, these two parameters are used to construct the initial Street View object.
Let’s examine the GPov class in greater detail. GPov is an object literal which simply means that you do not create individual instances of a GPov through either a constructor or via other objects. You simply use the properties and/or methods that are available to the literal class. Let’s take a look at a code example to illustrate this point.
Example: Setting the GPov properties
myPOV = { yaw:90.00, pitch:-20, zoom:30 }
Properties of GPov
GPov has three optional properties that you can set, each of which are numeric values.
yaw – The camera yaw in degrees relative to true north. True north is 0 degrees, east is 90 degrees, south is 180 degrees, and west is 270 degrees.
pitch – The camera pitch in degrees, relative to the street view vehicle. Values can range from 90 degrees (directly upwards) to -90 degrees (directly downwards)
zoom – The zoom level with 0 being fully zoomed-out, and values increased from there.
Note that I said all these parameters are optional. In the event that you choose not to define any properties for GPov, they each default to 0 which defines a flat horizontal view directly north with the widest possible view.
Applying GPov to Street View
Once you’ve defined the parameters for GPov you will need to assign it to a GStreetviewPanorama object for the settings to take effect. This can be done in two ways. The first method is to assign GPov to an instance of GStreetviewPanoramaOptions which is then used in the constructor for GStreetviewPanorama. Let’s take a closer look at how this is accomplished. GStreetviewPanoramaOptions, like GPov, is an object literal. This object literal has two properties that can be set: an instance of GLatLng, and an instance of GPov. A code example can help reinforce this concept.
Example: Setting the GStreetviewPanoramaOptions properties and then using it in the constructor for GStreetviewPanorama
panoramaOptions = { latlng:theAlamo, pov:myPOV }
myPano = new GStreetviewPanorama(document.getElementById(“pano”), panoramaOptions)
Click here to see the example in a web page. Notice that we have set the yaw parameter to 90 which sets the direction to east.
The second method of assigning GPov to an instance of GStreetviewPanorama is through the setLocationAndPOV( ) method available on GStreetviewPanorama. The setLocationAndPOV( ) method can be used to set the POV after an instance of GStreetviewPanorama has been created. Once again, a code example is helpful to reinforce this concept.
Example: Setting the POV through setLocationAndPOV
myPano = new GStreetviewPanorama(document.getElementById(“pano”));
var theAlamo = new GLatLng(29.425849,-98.486927);
myPOV = {yaw:90}myPano.setLocationAndPOV(theAlamo,myPOV)
Read Full Post | Make a Comment ( None so far )
Add Google Maps Street Views To Your Apps
Many Google Maps developers have been eagerly awaiting the inclusion of objects for controlling Street Views from the Google Maps API, and last week it became official! A handful of new objects including GStreetviewPanorama, GStreetviewOverlay, GStreetviewClient, and GStreetviewLocation among others have been added to the Google Maps API that allow developers to include these Flash enabled street visualizations.
What is StreetView?
For those of you who are not familiar with Google Maps Street View let me do a quick review. In certain large metropolitan areas of the U.S. you can view and navigate within Google Maps via street-level imagery. You’ll notice that when you go to the main Google Maps page a new button called Street View has been added to the display.

Clicking the Street View button will display a Camera for each city that has the capability of displaying Street Views. You can click on an individual camera to zoom to your city of interest.

Streets that are capable of displaying a Street View will be outlined in blue and you will also see a human icon that can be used to display a Street View. You can simply drag the icon onto the street you’d like to display or simply click on a street with your mouse.

This street-level imagery is provided through a Flash plugin so you should make sure that you have installed the latest version of Flash for your browser. You’ll notice that a number of navigation and display controls are embedded in the Street View.
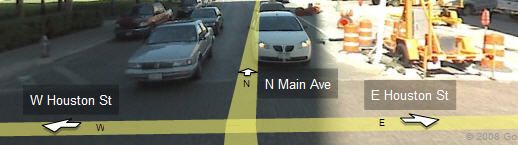
Navigating the streets
Each street is labeled and contains arrows indicating direction. You can click these arrows to navigate further in that direction.
Zooming
There are a number of methods that you can use to control zooming in and out on the image. Double-clicking the image, using your mouse wheel, or using the zoom control can all be used to zoom in on the image. Once you’ve zoomed in a ‘Zoom Out’ button will then be provided or you can use the mouse wheel or zoom control to move back out on the image.
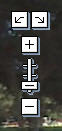
Panning
Panning is accomplished either by dragging the image in the direction in which you’d like to pan or by clicking the pan buttons. You can even tilt the image to see the sky or ground by dragging the mouse up or down.
You can also use the arrow keys on your keyboard to control navigation along the street and to pan the image display.
New Classes in the Google Maps API
Let’s do a quick overview of the new classes for controlling Street View that have been added to the Google Maps API.
GStreetviewPanorama – Holds an instance of the Flash® Street View Panorama viewer. Normally embedded within a container object such as <div> and can be manipulated through its methods.
GStreetviewPanoramaOptions – Represents options that can be passed to the GStreetviewPanorama constructor.
GStreetviewOverlay – Tileset highlighting locations where Street View data is available.
GStreetviewClient – Performs searches for Street View data based on parameters passed to its method.
GStreetviewData – Represents the data associated with a panorama.
GStreetviewLocation – Represents a street view location.
GStreetviewLink – Represents a link from one GStreetviewLocation to a neighboring GStreetviewLocation.
GPov – Repreesents the structure of a camera point of view used by street view.
A Simple Example
I’m going to do a series of posts that show you how to use these classes in your Google Maps application. In this post we’ll start with a simple example. Click here to see our first example and you can display the code for this example by right clicking the page and selecting View Source. If you’ll click the right pan button twice you should see the Alamo in San Antonio, Texas. Let’s review the code.
The new Street View classes that have been added to the Google Maps API are accessible through JavaScript just the same as any other class in the API. Let’s first review the a line of HTML code near the bottom of the file.

The <div> tag is used as a container for the Street View and you will need to assign an id to the div along with a height and width for the container. Notice that we have assigned a value of ‘pano’ as our id. You’ll see this value again inside the JavaScript when we assign our StreetViewPanorama to this container. You’ll also notice in the code above that we have defined a JavaScript function that will be called in response to the onload event. In this case, the initialize() function will be called when the page loads. So, let’s take a look at the initialize() function since this is where we create our Street View.
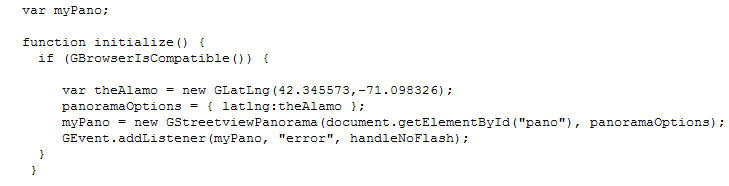
Just above the initialize() function you’ll notice that we’ve declared a variable called myPano which will store the Street View Panorama that is created. Inside the function we create a new GLatLng object from a pair of coordinates and store this object in a variable called theAlamo. This value is then used in the panoramaOptions variable which will be passed into the constructor for GStreetviewPanorama in the next line. Remember that we said the GStreetviewPanorama object holds an instance of the Flash® Street View Panorama viewer. It is the primary object used for the Street Views in Google Maps. The supporting GStreetviewPanoramaOptions is used in the constuctor for GStreetviewPanorama and defines various options that are used to control the display and functionality of the viewer. In this case we’re only passing in a latitude/longitude coordinate value, but you can also pass in a GPov object that controls the camera orientation with which to open the Flash viewer. The other parameter in the GStreetviewPanorama constructor controls where the Street View will appear. This is where the <div> tag that we created in the HTML body comes into play. When we pass in document.getElementById(“pano”) to the constuctor we are specifically stating that the Street View should be placed in this <div> tag container. Finally, we add in an event listener for the Street View so that it can report browsers that are unable to support the Flash plugin.
This was a very simple example that demonstrates how you can use the new Street View classes in the Google Maps API to add in Street Views to your Google Maps application. In our new few posts we will take a look at more advanced Street View code examples.
For more information on the Google Maps API please see our popular e-learning course “Introduction to the Google Maps API.” This course has been in production since January 2006 and has been our best selling course since that time.
Read Full Post | Make a Comment ( 2 so far )


